.png) Tutorial - Creating and Editing Property Particulars and Brochures
Tutorial - Creating and Editing Property Particulars and Brochures
Tutorial - Creating and Editing Property Particulars and Brochures
Tutorial - Creating and Editing Property Particulars and Brochures
Pre-requisites
Click the Setup button
A list will appear on screen with some simple pre-designed templates. Select one of the options that best fits your requirements. This will load up the template in Word and allow you to modify the template as required
Once you've finished making the required changes to the template, click the Save button in Word and close Word
Click the Save button to save the template in Acquaint
Click the Particulars / List icon from the Properties icon under the Configuration & Administration tab
Click the New button
In the Description field type a name for the template
Click the drop down arrow at the end of the Word File Name field
Browse to the Word document and double click to select it
Click the Setup button. This will load up the Word document in Word and allow you to modify it as required
Once you've finished making the required changes to the document click the Save button in Word and close Word
- Description
- Word File Name - the file name of a Microsoft Word Document (.DOC / .DOCX ) or Template (.DOT / .DOTX) to use. If a file name is not specified then Acquaint will create a file with a named based on the Description.
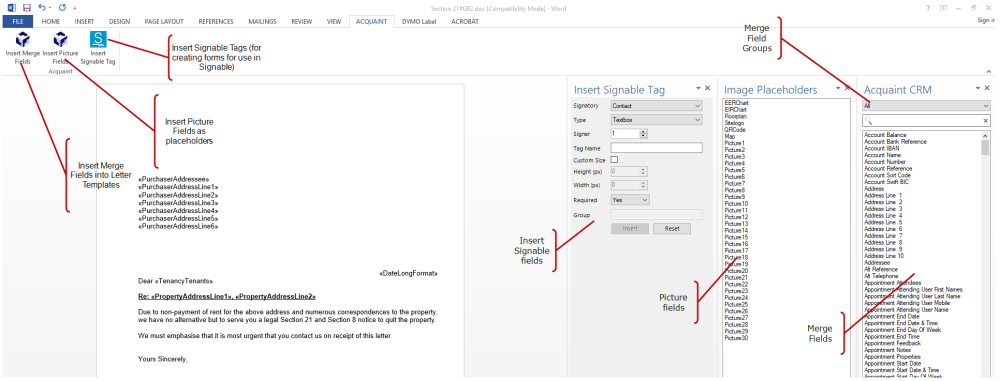
Merge Fields are using for merging Property details such as Price, Rooms etc.
How to insert a merge field into the template depends on the version of Word you're running
For Word 2000/2002/2003
Click the Insert Merge Field button located left of the Insert Word Field button in the toolbar
Select the required merge field from the list and click the Insert button
Once you've inserted all the required merge fields click Close button on the Merge Fields box
For Word 2007/2010 /2013
Click on the Mailings tab
Click the Insert Merge Field button
Select the required merge field from the list and click the Insert button
Once you've inserted all the required merge fields click Close button on the Merge Fields box
Picture Fields are used for pictorial information such as EER Charts, Floor Plans, Property photos etc.
This is the simplest method.
When the Template is opened in Edit Mode in MS Word an Insert Picture Fields icon will appear. The Image Placeholders column will appear listing the available fields. Click the desired position in the Word Document and select the required Image Placefolder by double clicking. You can use drag and drop to move the Image Placeholder and resize.
Insert a table into the template and set the autofit property to 'Fixed Column Width'
Click in the cell you wish the picture to appear in
Change the column size/cell width to the desired picture width
If you want to put a border around the picture:
Right click on the table
Go to Table Properties > Options
Set all margins to 0 cm
Click Ok
Click on Borders and Shading and select how you want the border to appear
If you don't want a border around the picture:
Right click on the table
Select Borders and Shading
Select None
Click Ok
Click into the table and press CTRL + F9 this will insert special word field brackets (use ALT + F9 to see existing merge fields)
In the template click where you wish the picture to appear
Click on Insert > Bookmark
For the Bookmark Name type the name of the required bookmark (e.g. Picture1)
Click the Add button to add the bookmark to the template and close the Bookmarks box
Click the Particulars/List icon from the Properties icon under the Configuration & Administration tab.
Click on the template you wish to change the size of a bookmark picture
Click the Edit button
Click the Bookmarks tab
Change the relevant field to the required size
Note these sizes are done in pixels
Click the Save button
Load up the Property record that you wish to create particulars for
Click the Create Particulars button
Select a Template from the list
This will create a Word document based on the selected template and the property record in Acquaint.
Note:
- The particulars may take a couple minutes to load completely
- The particulars, once created, will be saved against the property
Find the Property that you wish to create particulars for.
Click the Correspondence button
In the Property Particulars / Attachments section double click on the set of particulars you wish to edit
This will load the particulars from a saved Word document
Once you've finished making changes click the Save button and close Word
This process is essentially the same process as detailed in the Creating Particulars section above
Find the Property that you wish to create particulars for.
Click the Create Particulars button
Select a template from the list
A warning message will appear asking if you're sure you want to recreate the particulars
This will recreate a Word document based on the selected template and the property record in Acquaint
This will overwrite any changes that you have manually made to the previous set of particulars. Any changes you have made and would like to keep you will have to apply again to the new set of particulars
Find the Property that you wish to create particulars for.
Click on the Correspondence button
In the Property Particulars / Attachments section highlight the set of particulars you wish to upload
Click the Create PDF button. This will create a PDF version of your particulars and attach the file to the Property Particulars / Attachments section
Note this may take a couple minutes to complete depending on the set of particulars you've selected
Once the PDF has appeared in the Property Particulars / Attachments section close the property record
On the Main tab of Acquaint click the Web Upload button
Click the Run button
Find the Property that you wish to create particulars for
Click on the Correspondence button
In the Property Particulars / Attachments section highlight the set of particulars you wish to delete
Click the Delete button
A message box will appear asking whether you would like to delete the physical file off your PC. If you would like to completely remove the file select yes.
Note deleting the Word document for the particulars will not remove the PDF file from your own website or property portals. To do this delete the PDF file